A Guide to Planning and Executing a Directional Boring Project
- Grid Tech
- May 16, 2023
- 3 min read

Welcome to the world of directional boring!
Directional boring, also known as horizontal directional drilling (HDD), is a drilling method used to install underground infrastructure such as pipes, conduits, and cables. Unlike traditional drilling methods, directional boring allows for the installation of these utilities without the need for excavation, reducing disruption to the surface area.
This advanced drilling technique has become a preferred method for many construction projects due to its ability to minimize the impact on the environment, reduce costs, and improve project efficiency.
However, like any construction project, planning and executing a directional boring project can be a complex and challenging endeavor. It requires a deep understanding of the technical aspects involved, significant investment of time, money, as well as the ability to manage various stakeholders and resources effectively.
In this guide, we aim to provide a comprehensive overview of the key considerations and best practices for planning and executing a successful directional boring project. Whether you are a seasoned professional or new to the field, this guide will equip you with the knowledge and tools necessary to take on your next directional boring project with confidence and success.
So, let's get started!
Step 1: Site Evaluation and Survey
The first step in planning a directional boring project is to conduct a site evaluation and survey. This involves assessing the site's geological and topographical characteristics, identifying any underground utilities, and obtaining any necessary permits or approvals. A site survey is also conducted to determine the ideal entry and exit points for the bore path, the drill head size and type, and the type of drilling fluid to be used.
Step 2: Equipment and Material Selection
The next step is to select the appropriate equipment and materials for the directional boring project. This includes choosing the drill rig, drill head, and drilling fluid. The size and type of drill rig and drill head will depend on the length, diameter, and depth of the bore path. The drilling fluid is also selected based on the geological characteristics of the site, such as soil type and groundwater level.
Step 3: Bore Path Design
The bore path design is critical to the success of a directional boring project. This involves determining the depth and alignment of the bore path, as well as any changes in direction or elevation. The bore path must also be designed to avoid any underground utilities or other obstacles that may be present. The design of the bore path is typically created using specialized software, and the final design is verified through bore path tracking during the drilling process.
Step 4: Pre-Drilling Set-Up
Before drilling begins in your directional boring project, several pre-drilling activities must be completed. This includes setting up the drill rig and drill head at the entry point, ensuring that the bore path is clear of any debris or obstructions, and connecting the drilling fluid supply and return lines. The drill head is then guided into the bore path using a wireline guidance system.
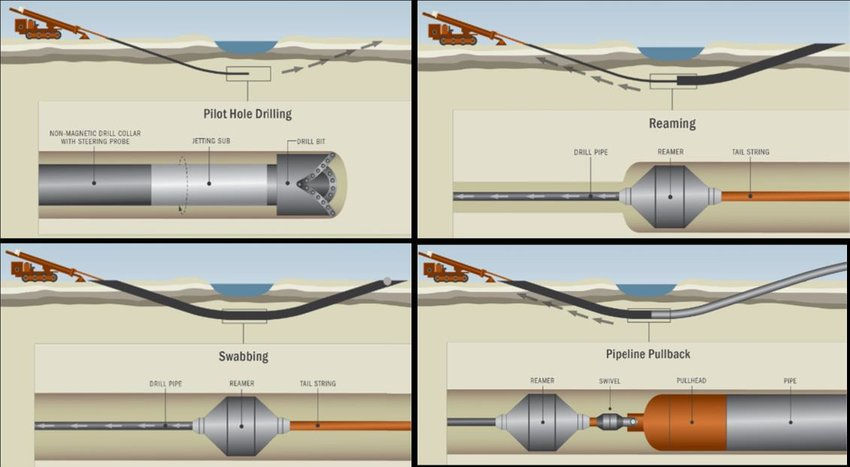
Step 5: Drilling
The drilling process involves rotating the drill head and pushing it through the bore path. The drilling fluid is used to lubricate the drill head, stabilize the bore path, and remove the cuttings from the borehole. The drilling operator monitors the drilling progress and adjusts the drilling parameters as needed to maintain the correct bore path alignment and avoid any obstacles in directional boring projects.
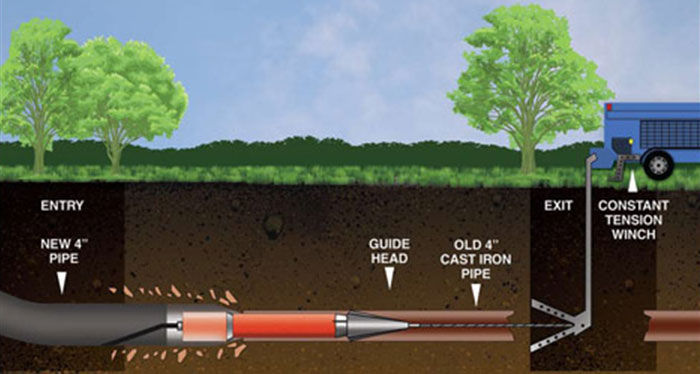
Step 6: Pullback
Once the drill head has reached the exit point, the pullback process begins. This involves pulling back the drill string and conduit or pipeline through the borehole. The pulling force is generated by the drill rig or a separate pullback machine. The pulling force is carefully controlled to avoid damaging the conduit or pipeline in directional boring.
Step 7: Finishing and Clean-Up
After the pullback process is completed, the conduit or pipeline is connected to the existing infrastructure at the entry and exit points. The borehole is then backfilled with a suitable material, such as drilling fluid, bentonite, or sand. Any remaining debris or waste materials are removed from the site, and the site is restored to its pre-project condition during your directional boring project.
Conclusion
A successful directional boring project requires meticulous planning, skilled execution, and close collaboration between all stakeholders involved. By following the step-by-step process outlined in this guide, project managers, engineers, and contractors can ensure that their directional boring project is completed on time, within budget, and with minimal environmental impact. From site evaluation and survey to equipment and material selection, bore path design, pre-drilling set-up, drilling, pullback, and finishing, every stage of the project requires careful attention to detail and adherence to best practices.
By leveraging the latest technology and equipment, such as specialized software and drill rigs, directional boring projects can be completed with greater precision and efficiency than ever before.
With the increasing demand for underground infrastructure, directional boring is poised to become an increasingly popular method for installing pipelines, conduits, and cables in urban and sensitive areas.

Comments