What to Expect in a Horizontal Directional Drilling Project: Step-By-Step Guide
- Grid Tech
- Sep 9, 2023
- 5 min read
If you have ever been intrigued by how utilities like gas lines, water pipes or telecom cables are installed without disrupting the surface or landscape, then you have likely heard of horizontal directional drilling (HDD).
This groundbreaking method allows for precise, efficient installations while minimizing environmental impact. Yet, many wonder what actually happens during an HDD project.
Today, in this comprehensive guide, we will walk you through each step of the process. Our primary focus will be on “underground directional drilling”, a subset of HDD that’s vital for subsurface installations.
So, whether you are a project manager looking to adopt this technology or a curious mind aiming to understand the mechanics, this blog post is your go-to resource for understanding what to expect in a horizontal directional drilling project.
Planning Phase

Site Survey and Analysis:
Before any drilling begins, an extensive site survey and analysis form the bedrock of any successful horizontal directional drilling (HDD) project. Soil composition is studied in detail because it directly influences the type of drilling equipment and drilling fluids needed. The type of soil—be it clay, silt, sand, or rock—can affect drilling speed, accuracy, and equipment wear and tear. Using ground-penetrating radar or electromagnetic equipment, surveyors also check for existing underground utilities like gas lines, water pipes, or electrical cables to avoid costly or dangerous collisions.
Environmental assessments are another integral part of this phase. These assessments look at local flora and fauna, nearby water bodies, and any other ecological factors that could be affected by the drilling. In essence, the site survey and analysis aim to gather data that ensures the project adheres to environmental regulations while optimizing operational efficiency.
Feasibility Study:
Once the site survey is complete, a feasibility study dives into the nitty-gritty details to evaluate if HDD is the optimal method for the project at hand. This involves a detailed cost-benefit analysis that weighs the overall cost of the project against the advantages offered by HDD, such as minimal surface disruption and quicker installation times. Safety protocols are scrutinized, focusing on both worker safety and public safety. The environmental impact is gauged to ensure compliance with local and federal regulations. Only after a thorough feasibility study can the project proceed to the next stage.

Designing the Drilling Path:
Armed with data from the site survey and feasibility study, engineers then use specialized computer-aided design (CAD) software to plot the drilling path. This digital blueprint lays out the entire drilling route, pinpointing the entry and exit points and detailing any curves or obstacles that the drill must navigate.
In "underground directional drilling," precision is key; a minor error in the trajectory can lead to significant issues later on, including operational delays or even failure. Thus, expertise in underground directional drilling is crucial at this juncture to ensure that the path is accurate, safe, and achievable, setting the stage for a successful drilling project.
Pre-Drilling Activities
Regulatory Approvals:
Before any drilling activities get underway, a significant amount of paperwork needs to be sorted. It's crucial to obtain all the required permits and approvals to avoid legal complications down the line. The process usually involves consulting with local and state regulatory bodies to ensure the project complies with all rules and guidelines. This is particularly important if the drilling path crosses public lands, water bodies, or protected environmental zones.
The approval process may require the submission of the feasibility study, environmental impact assessment, and site survey details. Only after these permits are granted can drilling legally commence, making this a critical, non-negotiable step in any horizontal directional drilling project.

Equipment Selection and Setup:
Once the regulatory hurdles are cleared, the next phase involves choosing the appropriate equipment for the job. This includes not only the drilling rig itself but also supplementary systems like locating equipment to track the drill head's progress and suitable drilling fluids to lubricate the process. Selection is often based on the specific needs and challenges of the project, which have been identified in the site survey and feasibility study.
For instance, harder soil types might necessitate more powerful drilling rigs and specialized drilling fluids. After selection, these various components are transported to the site, set up, and rigorously tested to ensure they are in optimal condition for the actual drilling process. Equipment setup is a nuanced task, requiring expertise to ensure safety and efficiency during the drilling operation.
Drilling Process
Pilot Hole:
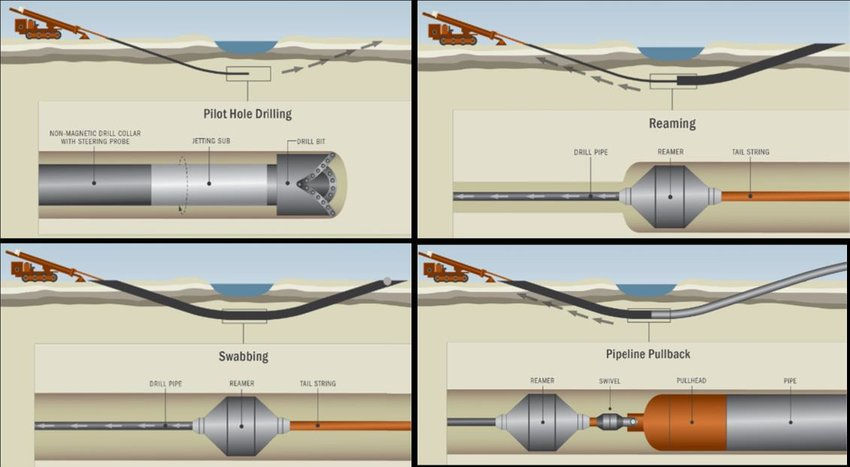
The drilling process kicks off with the creation of a pilot hole, a straight, narrow channel that serves as a guided path for subsequent drilling activities. Following the pre-designed trajectory developed during the planning phase, the drill head advances underground. At this stage, precision is crucial; even a minor deviation can have far-reaching consequences, affecting the project's overall timeline, safety, and budget. Tracking systems continuously monitor the drill head's position to ensure alignment with the planned route. The pilot hole sets the foundation for the entire operation, so getting this right is vital for the success of any "underground directional drilling" project.
Reaming:
Following the successful drilling of the pilot hole, the reaming process commences. The goal here is to enlarge the hole to a diameter that can accommodate the utility—be it a pipe, cable, or other conduits—being installed. Reaming often requires multiple passes to gradually increase the hole's size, especially for larger utilities. The reaming process is also essential for stabilizing the borehole walls, ensuring they don't collapse during subsequent phases. Drill operators must be skilled in maintaining the correct speed and pressure to ensure a smooth reaming process.

Pullback:
The final stage is the pullback, where the utility line is installed. A pipe or cable is connected to the drill string and then pulled back through the reamed hole from the exit point to the entry point. Hydraulic systems are typically used to facilitate the pullback, providing the required force to install the utility. This phase marks the culmination of the "underground directional drilling" operation.
It's a delicate stage; improper pullback can lead to utility damage or misalignment. Once the pullback is successfully completed, the utility is effectively installed underground with minimal surface disruption, achieving the core objective of HDD.
Post-Drilling Activities
Site Restoration:
Upon completion, the drilling equipment is removed, and the site is restored to its original state. This involves tasks such as filling any pits that were dug for the drilling process and restoring vegetation, if applicable.
Quality Checks and Documentation:
Post-installation quality checks are performed to ensure the installed utility meets all specifications and standards. Additionally, documentation detailing the project specifics, such as drilling logs and as-built drawings, is finalized.
Conclusion
From the initial planning stages to post-installation quality checks, a horizontal directional drilling project is a meticulous process that requires thorough planning, specialized equipment, and skilled operation.
We've delved deep into the realm of "underground directional drilling," demystifying each step so you can approach your next HDD project with confidence. While the process may seem complex, its benefits of minimal surface disruption and environmental conservation make it a preferred method for installing underground utilities.
So, the next time you see a seamlessly installed gas line or a cable without any surface disruption, you’ll know the intricate process and expertise that went into making it happen, thanks to the wonders of horizontal directional drilling.


Comments